How to Make Marshmallow with Printed Photos
Caketoppers are not just for cakes! Here we show you how to make your own printed marshmallows with photos. You can use our printed edible wafer sheets or icing sheets.
Edible Photos
First order your printed wafer or icing. The sheets are available in various sizes and shapes. They are easily cut down to suit how you want your finished marshmallow. This could be round, square or oblong. Wafer is much cheaper than icing and available in packs of 5 sheets. So if you are making lots then this could be the choice for you. Normally we recommend printed icing rather than the wafer for cakes and cupcakes. It gives a better print quality, but I’ve found with marshmallow the wafer also gives a very good finish. If you are serving and eating the printed marshmallows straight away then the icing sheets work very well. If you are storing it for a few days I suggest the wafer instead as the icing can become tacky over time.
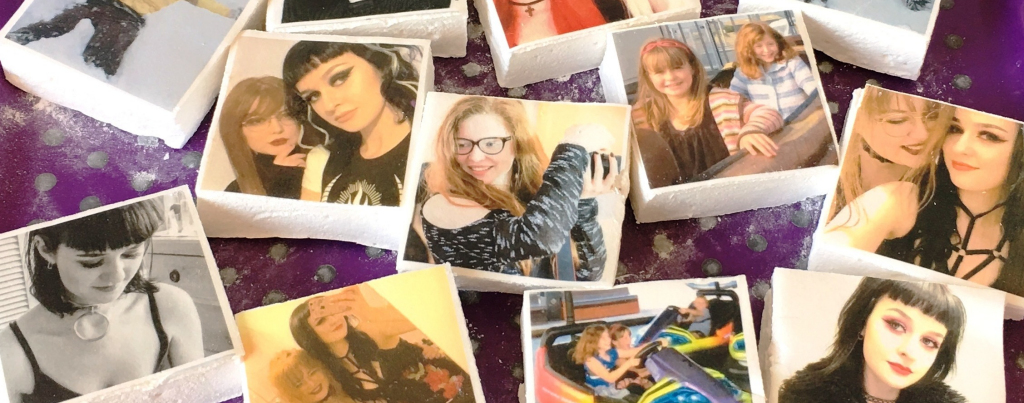
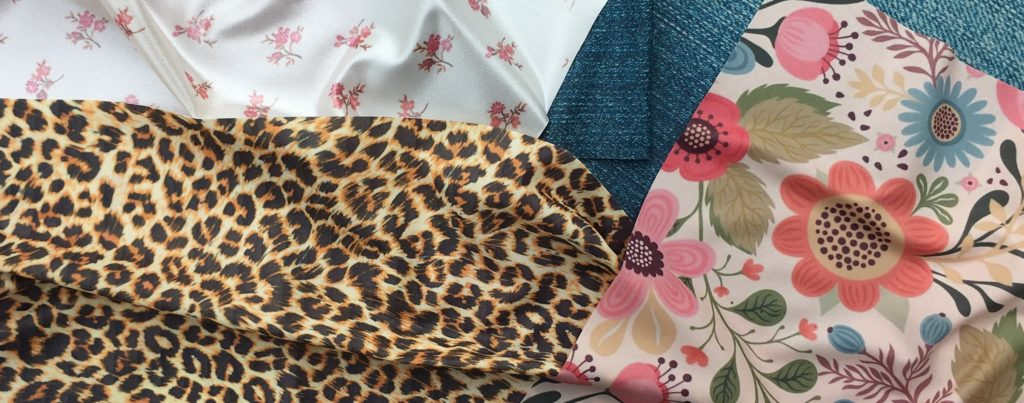
You can have any kind of photo – old or new, colour, black & white or sepia. I’ve used a collage of pictures so I can cut the marshmallow into individual squares.
How to Make Printed Marshmallow
 I’ve included my recipe at the end of this page as I think it works well with the toppers, but you can use any marshmallow recipe. Maybe you already have your own tried and tested method or there are plenty available on the web. I used water, sugar, liquid glucose and gelatine plus icing sugar for dusting. Other recipes use egg whites or golden syrup and you can add flavouring to taste such as vanilla extract. All the ingredients are available in supermarkets and you might already have them in your cupboard.
Tip: Coconut oil is great for greasing your tin and pallet knife or spatula.
In a nutshell you pour the marshmallow mix in a baking tin and leave to set. Turn it out of the tin and the underside will be both flat and tacky. You just place your printed wafer or icing on top and will stick itself. You can cut it up either before or after you put the wafer on. Here are the details of how I did it with lots of tips to get perfect results.
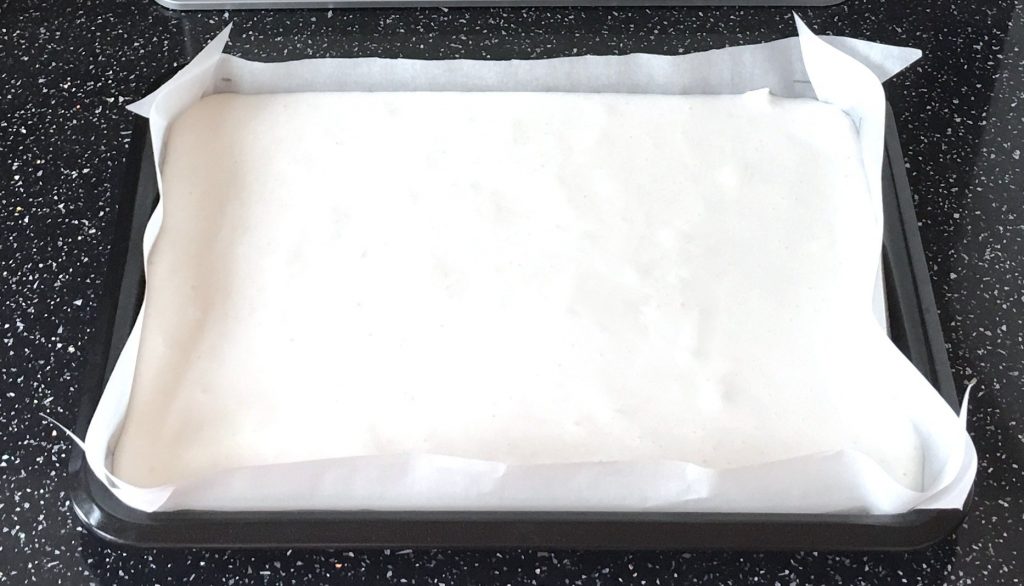
First line your tin. Grease the tin first (this helps the paper stay in place) and make sure the base is smooth is flat and the sides are covered. Also grease the lining paper and make sure you do the sides as well as the base. This makes it easier to remove the paper after your marshmallow has set.
Make your marshmallow mix and as pour it into the tin. Smooth over the top with a greased palette knife or spatula and leave to set. The time this takes depends on your recipe, usually a few hours.
Tip: The longer you leave it the drier it will be, so it’s best to check every couple of hours. You want it just set so you can turn it out of the pan, but still tacky so the wafer will stick to it.
Once it’s set and while it’s still in the pan, sprinkle some icing sugar over the top and lay a sheet of paper over it.
Put a tray or chopping board (or whatever you have handy) over the top. This is so you can just flip it over.
Lift away the pan and lining paper and you should have a nice flat but tacky surface.
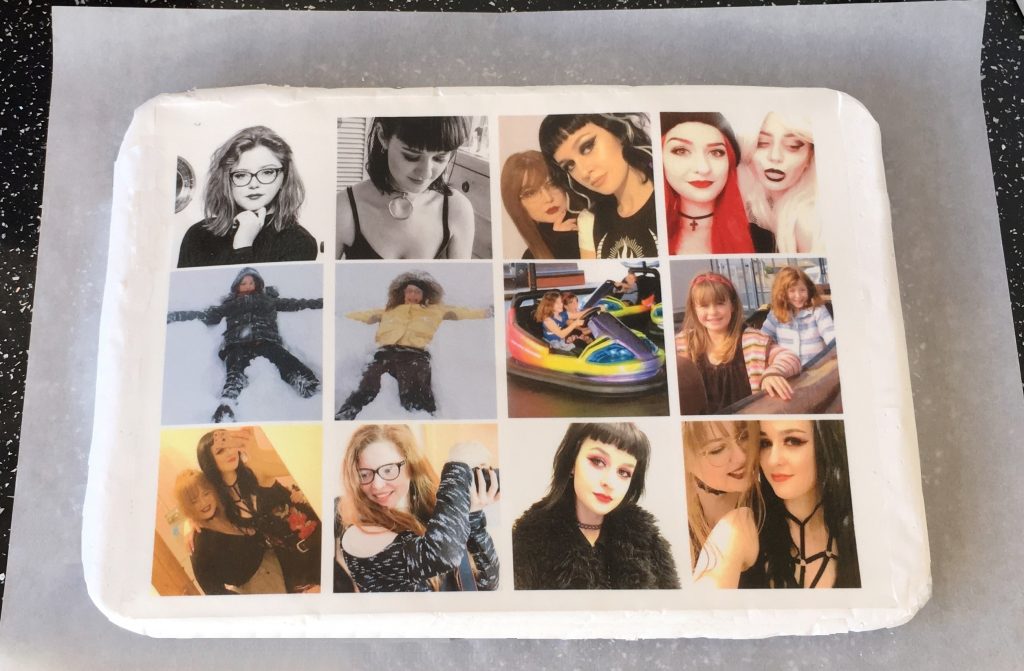
Lay the whole printed sheet on the top then cut it up.
Alternatively cut the sheet into shapes first and cut round them into the marshmallow.
Or cut both the sheet and marshmallow into matching shapes then put the shapes on top.
Tip: if your mix is a little dry and the picture is not sticking, make an edible glue. Use liquid glucose mixed with a little hot water. Just spread it on the back of the wafer or icing and it will stick nicely.
You can see that I used a collection of photos printed as a collage so that I can them cut them into squares. You would normally dip the cut pieces in icing sugar or cornflour. This is is still fine with the printed ones – you can just brush off any powder from the pictures. Use a clean, soft paintbrush for this.
Store your printed marshmallow in an air-tight container. It should keep at least for a couple of weeks, depending on your recipe.
My Marshmallow Recipe
Equipment you will need
- Baking tin slightly larger than your printed topper
- Baking paper to line the tin.
- An electric stand mixer with a metal whisk attachment
- Heavy base saucepan
- Sugar thermometer (optional)
Ingredients
- 25 g of powder gelatine (I used 2 x 12g of Dr Oetker sachets)
- 100 ml cold water
- 450g granulated sugar
- 175g cold water
- 1 tbsp liquid glucose
- Icing sugar for dusting
Method
Prepare your tin by greasing and lining it and also grease the lining paper.
Tip: I used coconut oil but you could use sunflower oil or whatever else you may have to hand.
Next soak the gelatine in the bowl of the mixer. Add the 100 ml of water first. Then sprinkle on the powder from the sachets and stir until it’s well mixed. Leave to soak while you continue with the recipe.
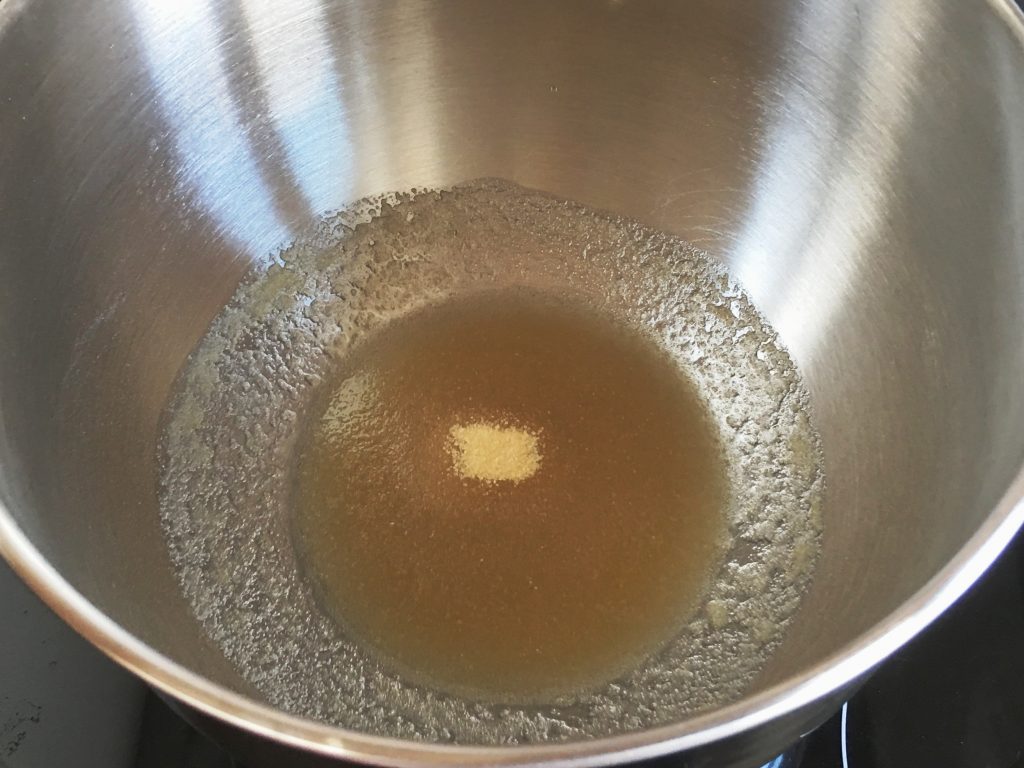
Now put the 175 ml of water, 450g sugar and tablespoon of liquid glucose into a heavy base pan.
Tip: Place your tube or pot of liquid glucose in a pot of hot water to make it more runny and easier to measure.
Set the pan on a medium heat and stir occasionally until the sugar has dissolved.
To stir or not to stir? There is much debate about whether you should stir while the sugar dissolves. As this recipe uses glucose it prevents the sugar from crystallising, so you can stir it.
Bring it up to the boil and let it simmer until it reaches 114 degrees. This temperature is called the soft ball stage. It takes anything from 5 to 15 minutes so keep your eye on the temperature.
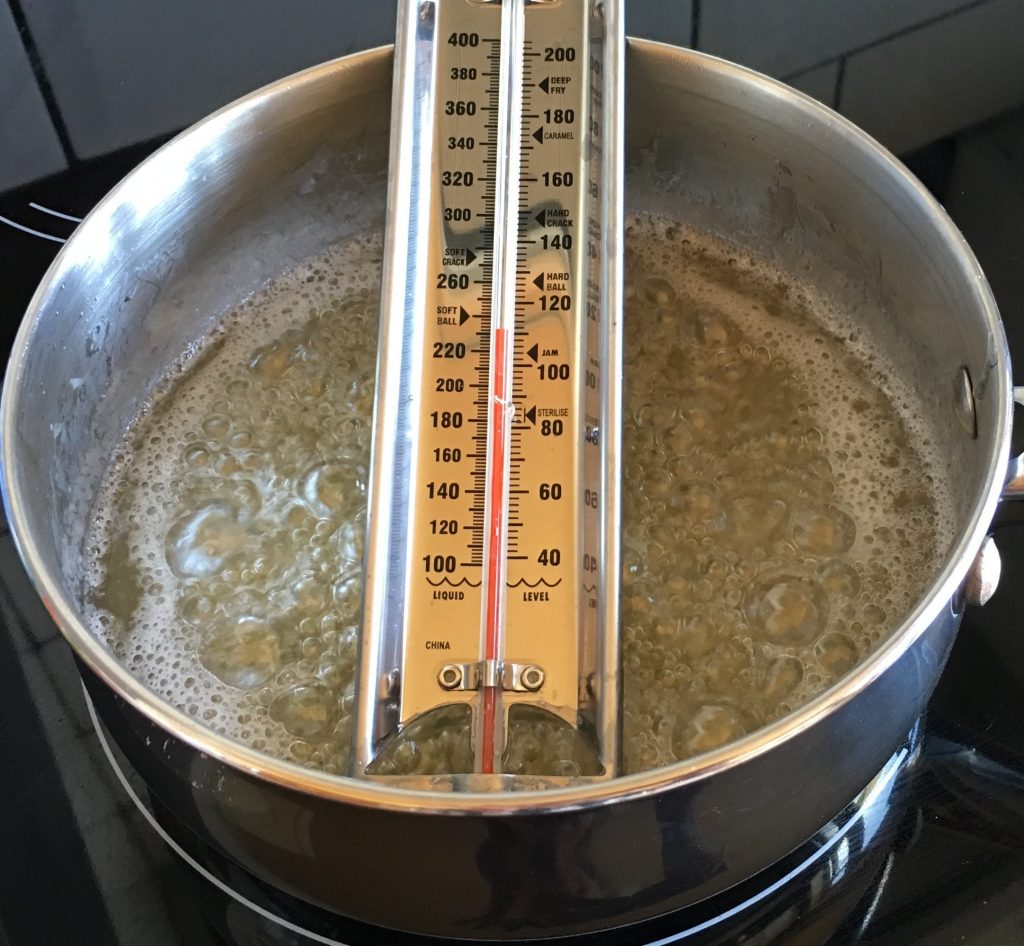
Tip: If you don’t have a sugar thermometer you can check when it’s ready as follows. Place a bowl of very cold water next to your pan. Drop a little of the syrup it into it. Leave to cool for a few seconds then pick up the ball of syrup. If it’s pliable, sticky and can be moulded in your fingers easily, it has reached the soft ball stage.
Once the syrup is ready put it to one side for a minute or so to let it cool down a little. Meanwhile, turn on the mixer with the gelatine to the lowest sitting. While it’s running, very carefully pour in the syrup from the saucepan into the mixer bowl. If you can, let the syrup dribble down the inside of the bowl.
Tip: Be very careful of the syrup as it’s very hot! You can take the bowl off the mixer first. Then pour in the syrup. Then return it to the mixer and turn it on immediately.
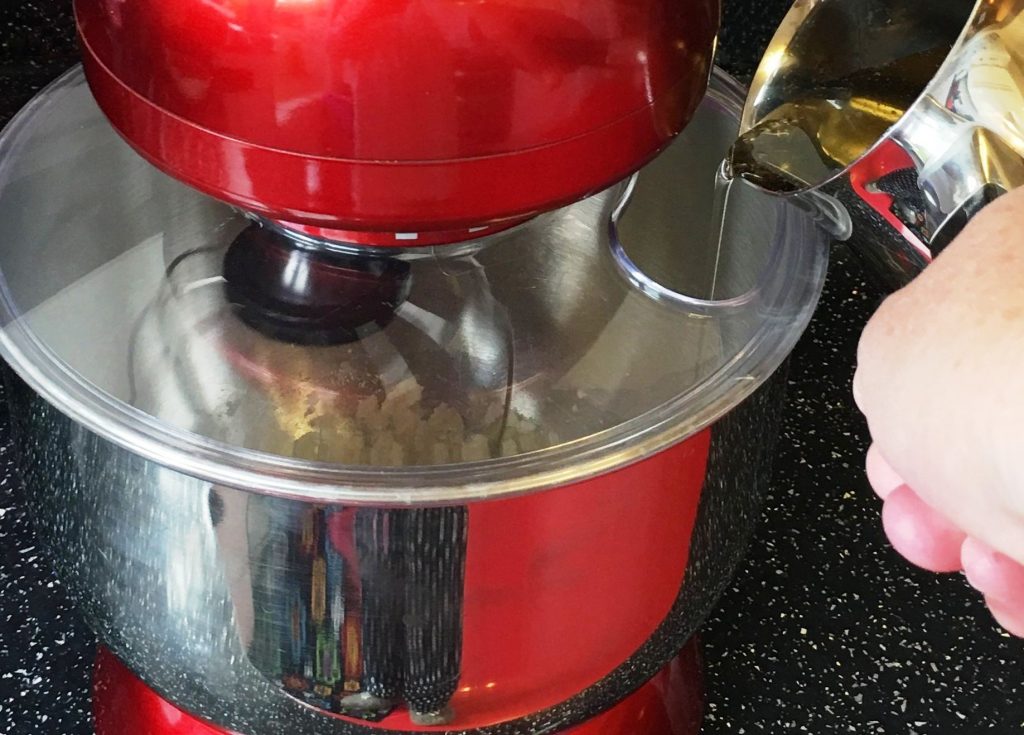
Now turn the mixer up to it’s highest setting. Whisk until the mixture is frothy, creamy. It should slowly pour off the whisk and hold its shape a little. This could take from 5 to 15 minutes depending on the speed of your mixture.
Tip: if you don’t have a stand mixer you can use a hand-held one but it will take longer.
Now pour the mixture into your prepared tin. Leave to set for about 4 hours or overnight.
Tip: to test if it’s ready the paper should lift away easily once the marshmallow has set.
Now see the previous instructions on how to get your printed photos on to the marshmallow.
<< Previous Post
How to make Edible Fabric from Printed Wafer
In this post we explain how to make your own edible fabric, edible silk or food safe denim. Achieve the look and feel of cloth using printed wafer paper and cheap supermarket ingredients costing around £2 to £3 ...
Next Post >>

Fake Promo Discount Voucher Codes
There are various websites advertising fake Caketoppers promo codes, discounts, coupons or vouchers for our products. These are usually found by searching phrases such as Caketoppers discount codes, Caketoppers.co.uk ...
